
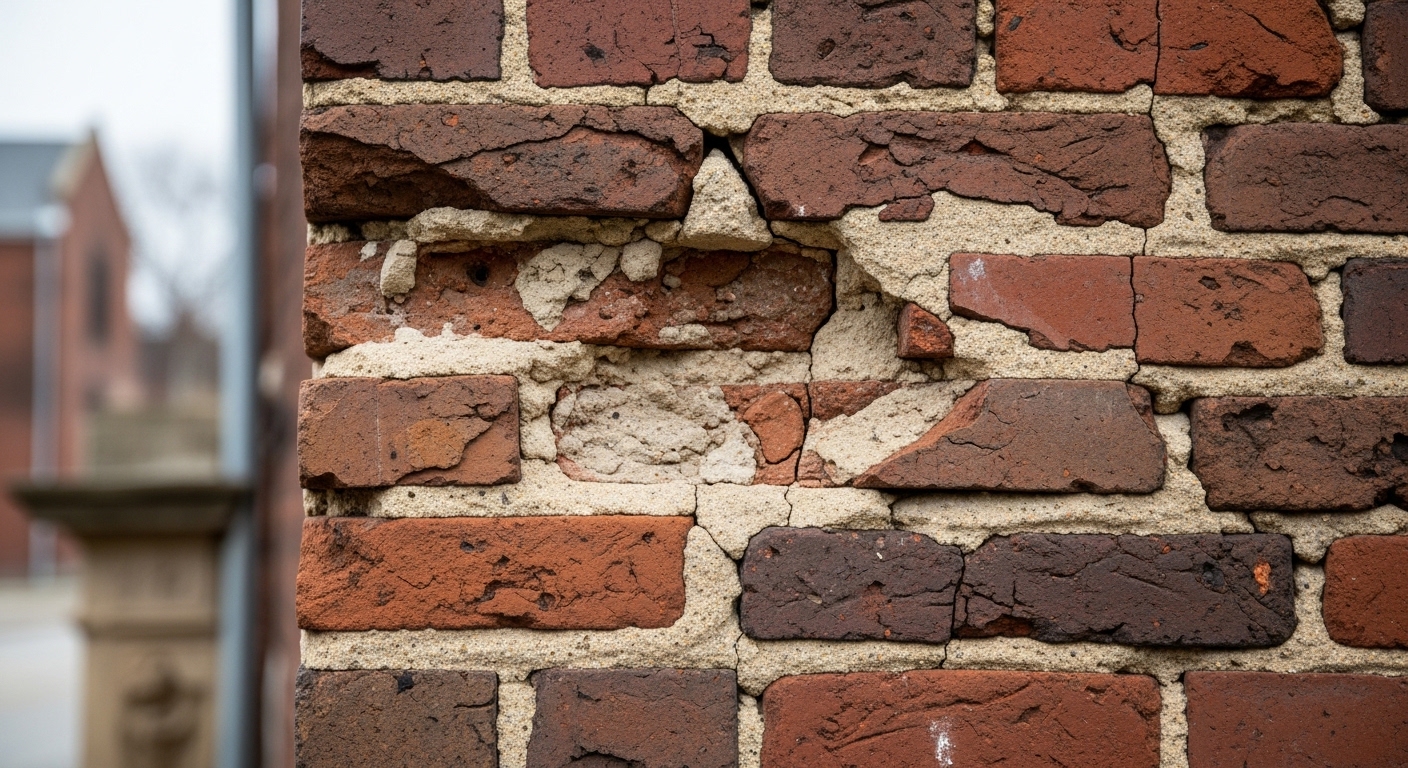
There’s this moment a lot of Canton homeowners have — and honestly, it’s not a fun one. You’re walking past your house, or maybe you’re just glancing at the chimney from the driveway, and something looks… off. The bricks themselves look fine, sure. But the stuff between them? The mortar? It’s crumbling, or it’s got gaps in it, or it’s turned a funky shade that just doesn’t look right.
That’s usually the moment when someone googles “what’s going on with my brick” and eventually lands on the word tuckpointing.
Here’s the thing: tuckpointing is one of those maintenance tasks that homeowners either know deeply or have never heard of. There’s not much middle ground. And if you’re in the “never heard of it” camp, don’t worry — we’re going to walk through exactly what it is, why it matters, and (maybe most importantly) how to tell if your building needs it.
If you’d rather just talk to someone who knows Canton’s brick buildings inside and out, feel free to reach out — but either way, read on. This stuff is genuinely useful to know.
So… What Actually Is Tuckpointing?
Tuckpointing is the process of removing old, damaged, or deteriorated mortar from between bricks (or stone), and replacing it with fresh mortar. That’s the simple version.
The slightly more specific version: in traditional tuckpointing, masons actually apply two different colors of mortar — one that matches the brick, and a thin contrasting line on top — to create the illusion of very fine, precise joints. It’s a technique that goes back to 18th-century England, where it was used to make ordinary brickwork look like the fancy, expensive stuff.
These days, a lot of people use “tuckpointing” and “repointing” interchangeably. Repointing is the broader term — it just means replacing the mortar, full stop. If someone in Canton tells you your chimney needs tuckpointing, they almost certainly mean repointing. Either way, the goal is the same: restore the mortar joints so your masonry is structurally sound and protected from water.
And water is really the villain of this whole story.
Why Mortar Matters More Than You Think
People tend to think bricks are the hero of a brick wall. They’re tough, they last forever, they look great. And that’s mostly true — a well-fired brick can last 100+ years without much issue.
But mortar? Mortar is softer by design. It’s supposed to be the “sacrificial” layer — it absorbs stress, movement, and water so the bricks don’t have to. And because it’s taking all of that punishment, it wears out. Typically mortar starts showing real wear after 25–50 years, depending on weather exposure and the original mix.
Canton, Ohio doesn’t exactly go easy on masonry. Freeze-thaw cycles in winter are brutal — water seeps into tiny mortar cracks, freezes, expands, and breaks the joint open a little more each time. By spring, those micro-cracks are macro-cracks. Repeat that for a few winters and you’ve got a serious problem.
When mortar fails, water gets in. When water gets in, you get damaged brickwork, rusted wall ties, interior leaks, mold, and — in worst-case scenarios — structural instability. Tuckpointing is essentially your building’s first line of defense against all of that.
The good news: catch it early enough, and it’s a manageable repair. Catch it late, and you’re looking at partial wall reconstruction. That’s not meant to scare you — it’s just how masonry works, and why it pays to know the warning signs.
7 Signs Your Canton Building Might Need Tuckpointing
Let’s get into the specific signs. These are the things masons actually look for when assessing a brick building — and some of them you can spot yourself from the ground, no ladder required.
1. Crumbling or Missing Mortar Joints
This one’s the most obvious, and it’s usually what gets people to pick up the phone. If you can see chunks of mortar missing from between the bricks — or if the mortar crumbles when you touch it — that’s a clear sign the joints have failed.
A simple field test: run a key or a screwdriver along a mortar joint. If it easily scratches or gouges out material, the mortar is too far gone to just patch. You’ll need proper repointing.
This is especially common on older Canton homes built in the early 1900s, where the original lime-based mortar has finally reached the end of its lifespan. That doesn’t make the building weak — it just means the joints need refreshing.
2. Visible Gaps or Recessed Mortar
Look at the joints from a slight angle — maybe stand a few feet back and look at the wall in raking light (early morning or late afternoon sun works great for this). If the mortar looks like it’s sitting back noticeably from the face of the bricks, that’s called recessing, and it’s a problem.
Properly filled mortar joints should be flush or just slightly recessed — maybe 1/4 inch at most. If you’re seeing joints that look hollowed out, water is already getting in there every time it rains.
Think of it like a bathtub caulk line that’s pulled away from the wall. It might not look like a big deal, but it’s letting water behind the tile every single shower.
3. White Staining on Your Brick (Efflorescence)
You’ve seen it — that chalky white or grayish film that sometimes appears on brick walls. It almost looks like the building is sweating. That’s called efflorescence, and it’s a tell-tale sign that water is moving through your masonry.
Here’s what’s happening: water infiltrates the wall, dissolves soluble salts inside the brick or mortar, and then carries those salts to the surface as it evaporates. The white stuff you see is the residue left behind.
Efflorescence itself isn’t the end of the world — it can be cleaned. But it’s a symptom, not the disease. It means water is finding its way in somewhere, and failed mortar joints are usually the culprit. Worth getting it checked out.
4. Cracks Running Through the Mortar (or the Bricks)
Not all cracks are equal. Hairline cracks in mortar joints that follow the joint pattern? Often normal settlement, and tuckpointing can handle it. Cracks that run through the bricks themselves, or large stair-step cracks that follow the mortar joints diagonally? That warrants a closer look from a professional.
The stair-step pattern in particular can indicate differential settlement — meaning different parts of the foundation are moving at different rates. That’s a structural conversation, not just a mortar one. But catching it early is important, and the fix often still involves tuckpointing as part of the solution.
If your building is a historic Canton structure — those gorgeous early-century brick homes you see around the city — historic masonry restoration requires specific expertise. Not all masons understand the nuances of working with older, softer brick.
5. Damp Interior Walls After Rain
This one’s sneaky because people often blame interior leaks on roof problems, window flashing, or plumbing — and sometimes they’re right. But failed mortar joints on exterior walls are a very common culprit that gets overlooked.
If you notice damp spots on interior walls after a heavy rain — especially on walls that have brick on the exterior — walk outside and check the mortar in that area. If you find crumbling or missing joints, you’ve probably found your leak.
Pro tip: chimney mortar failure is one of the most common sources of interior water damage, and it often gets misdiagnosed as a flashing problem. If your attic or ceiling near the chimney gets damp, get the chimney mortar inspected before you pay for a full flashing replacement.
6. Spalling or Flaking Brick Faces
Spalling is when the face of the brick literally breaks off — you’ll see chunks or flakes on the ground near your foundation, or rough, pitted surfaces on the brick itself. This is what happens when water gets deep into the brick (not just the mortar) and freeze-thaw cycles start working on the brick from the inside out.
Once spalling starts, the mortar is usually already compromised — or was the original entry point for the water. At this stage you’re looking at tuckpointing plus potentially some brick replacement.
The critical thing here: don’t just replace the spalled bricks without addressing the mortar. It’s like fixing a symptom without treating the cause. The water will just find new entry points and damage more bricks over time.
7. The Building Is 20+ Years Old and Has Never Been Repointed
This one’s simple: if you have a brick building and you have no record of the mortar ever being replaced, it’s worth having a mason take a look. Especially if you’re in that 25–50 year window.
A lot of Canton’s residential brick stock was built between 1900 and 1960. If your house falls in that range and has never had masonry work done, there’s a reasonable chance the mortar is reaching the end of its usable life — even if it looks okay from a distance.
A professional inspection is usually quick and often free or low-cost. And finding out everything’s fine is worth the peace of mind. Finding out there’s a fixable problem before it becomes a major one is even better.
Quick Reference: Warning Signs at a Glance
| Warning Sign | Urgency Level | Likely Fix |
| Crumbling / missing mortar | High | Full repointing |
| Recessed mortar joints | Medium-High | Repointing |
| Efflorescence (white staining) | Medium | Inspection + repointing |
| Stair-step cracks | High | Structural assessment + repointing |
| Damp interior walls after rain | High | Inspection, likely repointing |
| Spalling brick faces | High | Repointing + brick replacement |
| No maintenance in 20+ years | Medium | Inspection; repoint if needed |
Key Takeaways
- Tuckpointing (or repointing) replaces failing mortar to protect your masonry from water damage — it’s maintenance, not cosmetic work.
- Mortar typically lasts 25–50 years; Canton’s freeze-thaw winters accelerate wear.
- The 7 warning signs — crumbling mortar, efflorescence, cracks, interior dampness, spalling, recessed joints, or simple age — are your cues to get an inspection.
- Catching mortar failure early keeps repair costs manageable. Late-stage damage means partial wall reconstruction.
- Older Canton brick buildings require masons experienced with historic masonry — the wrong mortar mix can damage soft original brick.
- A professional inspection is usually fast and low-cost — worth it before small issues become expensive ones.
The Bottom Line (And What to Do Next)
Here’s the honest truth about tuckpointing: it’s not the most exciting home maintenance topic in the world. Nobody’s going to brag at a barbecue about having their mortar repointed. But it’s one of those unglamorous tasks that quietly keeps your building safe, dry, and structurally solid for decades.
Canton’s brick buildings — from the old colonials in Meyers Lake to the working-class bungalows on the west side — are genuinely beautiful. They were built to last. But they need a little attention every generation or so, and the mortar is always the first thing to go.
If you’ve spotted one (or more) of the warning signs we talked about, don’t sit on it. Masonry problems have a way of compounding fast once winter arrives. The freeze-thaw cycle doesn’t care about your timeline.
And if you’re dealing with a historic property, the stakes are even higher — both for preservation and for using the right materials. Historic masonry restoration isn’t something to hand off to just any contractor. The mortar mix matters. A lot.
If you’re not sure whether your building needs tuckpointing, honestly — just get it looked at. A good mason can assess the mortar in 20 minutes and give you a straight answer. No upsell, no drama, just information you can actually use.
That’s what you deserve. And that’s what Canton’s brick buildings deserve too.
Frequently Asked Questions
How long does tuckpointing last?
A properly done tuckpointing job with the right mortar mix should last 25–30 years, sometimes longer. The key is matching the mortar hardness to the original brick — harder isn’t always better, especially with older masonry.
Can I DIY tuckpointing?
Technically, yes — for small areas. But getting the mortar mix wrong can cause real damage to your brick, especially on older buildings. And matching the color is harder than it looks. For anything more than a small patch, professional repointing is worth it.
How much does tuckpointing cost in Canton, Ohio?
Costs vary based on building size, mortar joint depth, and accessibility. Generally, smaller repointing projects run a few hundred dollars; larger jobs on full facades can run into the thousands. Getting a few quotes is always smart. The cheapest option isn’t always the best one when it comes to masonry — bad work can create new problems.
What’s the difference between tuckpointing and repointing?
Repointing is the general term for replacing mortar. True tuckpointing involves applying two colors of mortar to create fine, decorative joint lines. In everyday contractor conversation, both terms usually mean the same thing: replacing damaged mortar. Ask your mason which technique they’re using if it matters for your project.